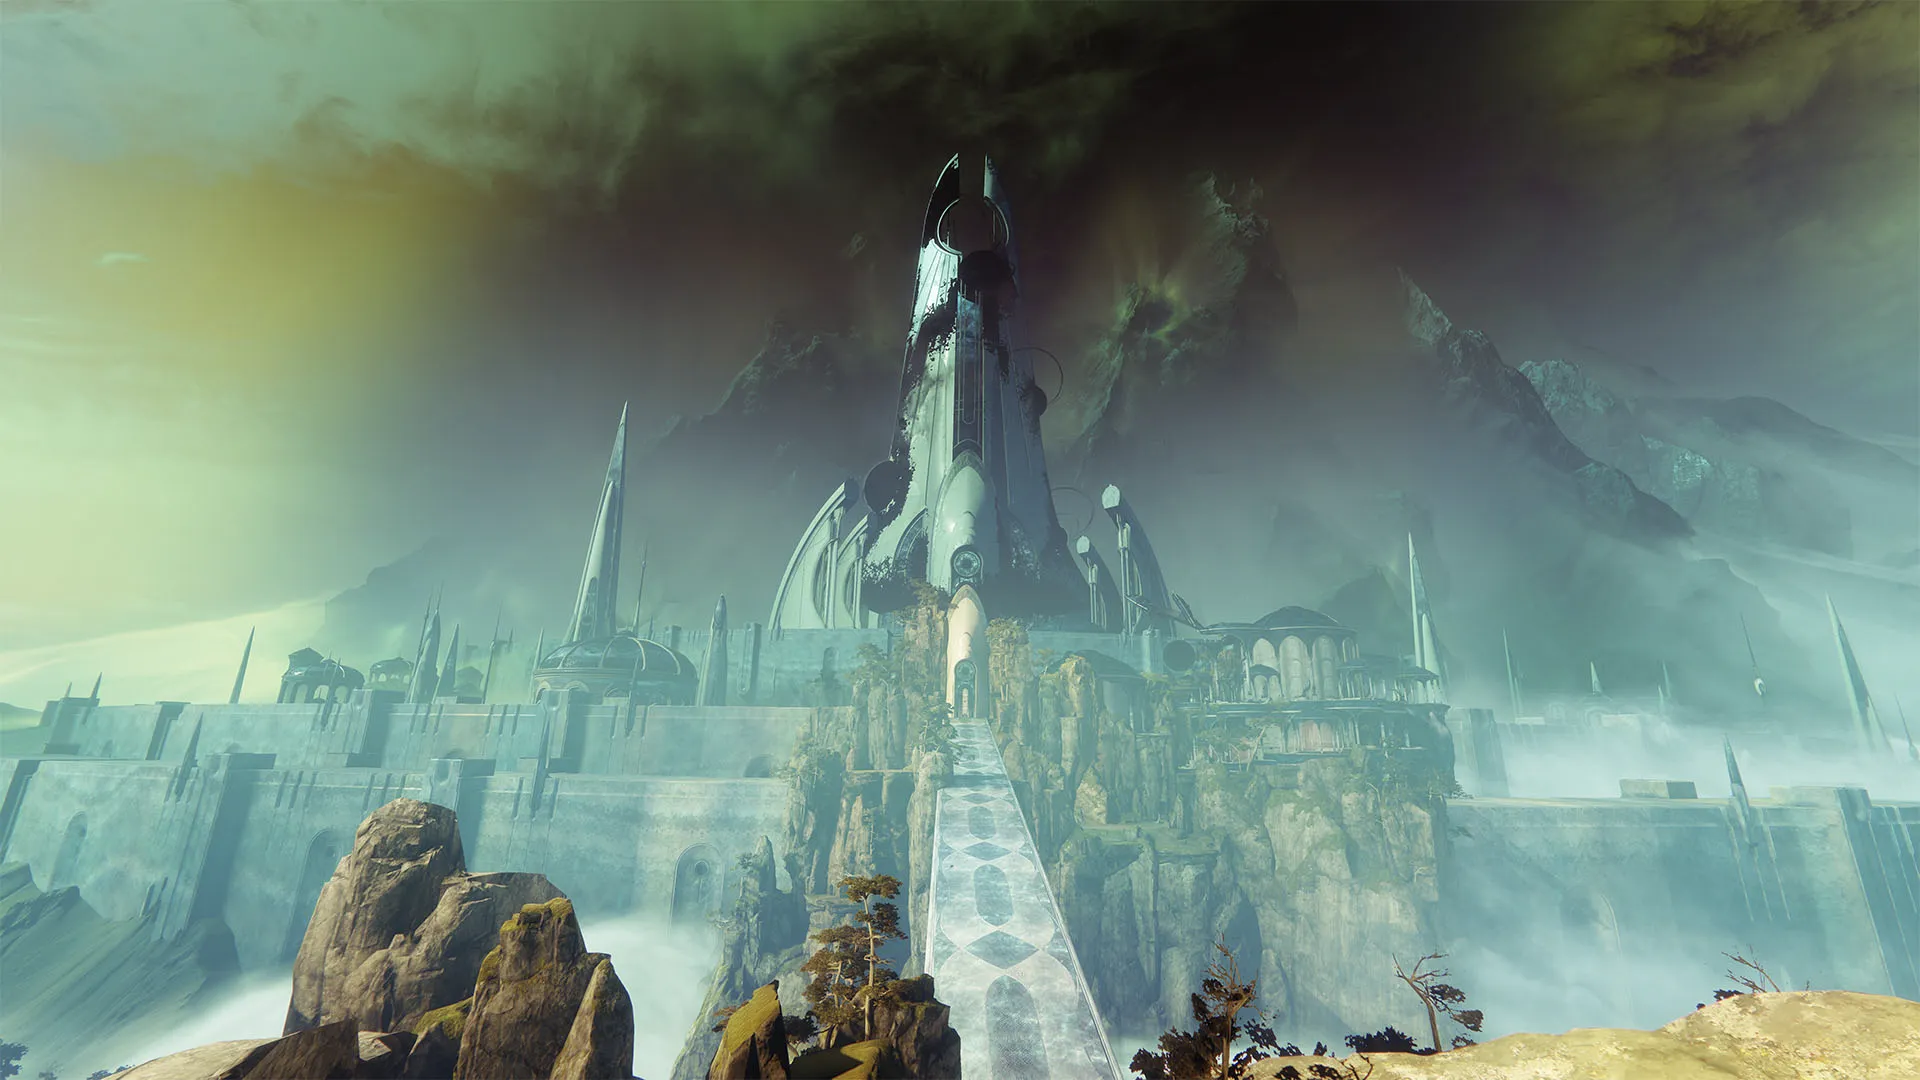
The Last Wish raid, nestled within the heart of Destiny 2’s Dreaming City, represents one of the game’s most intricate and lore-rich endgame activities. A testament to teamwork, strategy, and perseverance, Last Wish challenges guardians to confront their limits and band together to face the corruption seeping into the city’s very foundations. This raid is not just a series of battles; it’s a narrative experience that weaves the tale of Riven, the Taken Ahamkara, and the Awoken’s struggle against an encroaching darkness. Through its complex mechanics, breathtaking environments, and gripping storyline, Last Wish offers a raid experience.
As players step into the Dreaming City to undertake this epic quest, they’ll encounter a variety of challenges, from the bewildering puzzle of the Shuro Chi encounter to the strategic depth of the Morgeth battle, culminating in the climactic showdown with Riven of a Thousand Voices. This guide will equip would-be raiders with the knowledge and strategies to navigate the Last Wish raid’s labyrinthine corridors and formidable foes. Whether you’re a first-time raider hoping to make your mark or a seasoned veteran looking to refine your approach, the insights and tips herein prepare you for the trials ahead, ensuring that your fireteam can claim victory and perhaps, fulfill the Last Wish.
Raid Symbols
In the Last Wish raid, symbols are crucial, serving as the backbone of many puzzles and mechanics encountered throughout Dreaming City’s deepest secrets. These intricate icons guide guardians in deciphering the correct paths, solving complex puzzles, and unlocking the strategies needed to overcome the raid’s formidable challenges. From the initial plates in the Kalli encounter to the cryptic clues in the Vault, understanding and interpreting these symbols is essential for progress and ultimate success within the raid.
Kalli, the Corrupted
The “Last Wish” raid begins with a confrontation against Kalli, the Corrupted, setting an intense tone for the challenges within the Dreaming City. This encounter is a multifaceted test of the guardians’ abilities, teamwork and strategic thinking, introducing players to mechanics that demand coordination and adaptability. It’s an opening trial that prepares the team for the intricate trials that await as they delve deeper into the mysteries of the Dreaming City.
Objective
The objective is to activate the correct plates based on the displayed symbols and damage Kalli during the vulnerability phases, using safe rooms to survive her wipe mechanic.
Damage Weapon Choices
- Gjallarhorn: Ideal if your strategy includes rocket launchers, as its tracking missiles and Wolfpack Rounds significantly boost damage for legendary rocket launchers against Kalli.
- Divinity: Perfect for teams using Whisper of the Worm or linear fusion rifles, as it creates a critical hit spot that increases damage taken by Kalli.
- Tractor Cannon: A must-have if opting for swords or shotguns, given its ability to debuff enemies, increasing the damage they receive from all sources.
Subclass and Abilities:
- Warlocks: Should be on Well of Radiance, providing a significant damage boost and healing to the team, crucial for surviving the damage phases and any high-damage situations.
- Hunters: You can choose between tether (Nightstalker) to add control and generate orbs, or Golden Gun with Celestial Nighthawk for a high single-shot damage against Kalli, ideal during damage phases.
- Titans: Thundercrash offers a burst damage option against Kalli, while Burning Maul with Pyrogale provides both area control and consistent damage, adaptable to different phases of the encounter.
Before You Begin: Essential Preparations
- Symbol and Room Assignments: Symbol and room assignments are assigned according to roster order. Looking from the rally flag, the players in positions 1 and 2 in the team’s roster are responsible for the symbol hanging on the near left, players in positions 3 and 4 take the symbol hanging in the far middle, and positions 5 and 6 are assigned the symbol hanging near the right. Doors are read left to right, starting with the top row.
- Room Layout and Plate Mechanics: The encounter area is designed with a central circular pit surrounded by nine plates. Only six of these plates correspond to the correct symbols. The plates are divided into three sections, Guardians are tasked with activating these plates by adeptly avoiding lethal blight orbs that detonate periodically. This is achieved by standing on the one section free of blight orbs, repeating this action several times to spawn a Taken Knight.
- Activation and the Wipe Mechanic: Successfully defeating the Taken Knight that spawns on the plate activates it, ensuring a door will open for the guardian who activated the plate and providing a haven during Kalli’s wipe mechanic.
- Incorrect Plates and Ogre Spawn: Activating an incorrect plate will spawn an Ogre in the middle of the room, adding a layer of challenge.
Steps to Conquer Kalli
- Identify and Locate Plates: The team spreads out to find their assigned plate after determining symbol assignments.
- Plate Activation: Guardians position themselves at their assigned plates and, on signal, simultaneously jump onto these plates to start their activation. This involves dodging blight orbs and defeating a Taken Knight that spawns upon successfully avoiding the orbs, effectively activating the plate.
- Converge for Damage Phase: With plates activated, the team gathers at the central pit to engage Kalli in a damage phase. This is the critical window to unleash all available firepower and abilities to reduce her health as much as possible.
- Wipe Mechanic and Taking Shelter: Following the duration of the damage, Kalli initiates her wipe mechanic, and random doors in front of her position – one for each activated plate – open. Guardians must quickly determine their assigned room and enter with the door closing behind them, protecting them from the wipe attack.
- Repeat the Process: After the wipe mechanic concludes and the doors reopen, players return to the pit’s center to sequence the damage duration two more times.
- Encounter Reset for New Symbols: Players receive new symbols after the third damage sequence and start again.
Shuro Chi, the Corrupted
After the initial confrontation with Kalli, the “Last Wish” raid escalates the challenge with the intricate and fast-paced battle against Shuro Chi, the Corrupted. This encounter tests the guardians’ ability to juggle offensive tactics with complex problem-solving under the pressure of a tight timer. It’s a dance of precision, speed, and strategy as teams work to dismantle Shuro Chi’s defenses, solve puzzles, and ascend through the levels of the tower within the Dreaming City.
Completing the encounter against Shuro Chi requires precision, teamwork and a well-thought-out strategy, setting the stage for the challenges in the Last Wish raid.
Objective
The main goal in this encounter is to methodically reduce Shuro Chi’s health through several phases, interrupted by solving intricate puzzles under a strict time limit to prevent the team’s wipe. The fight is segmented into stages, requiring guardians to clear adds, break Shuro Chi’s shield, deal damage and complete puzzle rooms to progress.
Damage Weapon Choices
- The Fourth Horseman: An exotic shotgun that delivers substantial burst damage at close range. It’s incredibly effective during the short windows for damage against Shuro Chi, allowing guardians to unleash a rapid sequence of powerful shots to deplete her health quickly.
- Retrofit Escapade: This 900RPM machine gun, enhanced with the perks Target Lock and Fourth Time’s the Charm, becomes a relentless force on the battlefield. Target Lock dramatically increases damage output the longer the weapon is trained on a target, achieving a significant damage buff after maintaining a steady stream of hits, which synergizes seamlessly with Fourth Time’s the Charm by extending the magazine through precision hits. This combination maximizes the damage potential and ensures sustained fire with less frequent reloads, making it ideal for continuous damage phases against Shuro Chi.
- Witherhoard: This grenade launcher stands out for its ability to create persistent damage zones. Its projectiles inflict ongoing area-of-effect damage, effective for both add management and applying steady damage to Shuro Chi during phases when direct engagement is less feasible.
Subclass and Abilities:
- Warlocks: Well of Radiance is invaluable, offering both a damage boost and survivability during damage phases and while solving puzzles.
- Hunters: Nightstalker with Orpheus Rig can control adds and generate Orbs of Power, while Blade Barrage provides quick, concentrated damage to Shuro Chi.
- Titans: Thundercrash with Cuirass of the Falling Star is ideal for heavy hits on Shuro Chi, as is Burning Maul with Pyrogale Gauntlets for a devastating single-slam that unleashes multiple flame cyclones, providing extensive area control and damage.
Before You Begin: Essential Preparations
- Understanding Roles: Assign roles among the team, including Prism Weapon holders, Eye of Riven carriers and puzzle solvers. This ensures smooth transitions between phases.
- Puzzle Practice: Familiarize yourself with the puzzle layouts and strategies to solve them efficiently, minimizing time spent in puzzle rooms.
- Add Control: Designate specific guardians for add control during puzzles and damage phases to keep the team safe and focused on objectives.
Steps to Conquer Shuro Chi
- Engage Shuro Chi: Clear adds to approach Shuro Chi, initiating the encounter and starting the four-minute timer.
- Shield Break and Damage: Utilize the Prism Weapons to form a triangle and remove Shuro Chi’s shield. Three guardians must simultaneously stand on plates and shoot the person to their left, all while managing health due to plate-induced damage. Once the shield is down, focus fire to deplete a segment of Shuro Chi’s health bar.
- Interrupt Wipe Mechanic: If needed, a player holding the Eye of Riven can use their Super ability to interrupt Shuro Chi’s deadly attack, preventing a team wipe.
- Puzzle Room: Enter the puzzle room, where guardians face a series of three puzzle images, each requiring completion to progress. These puzzles feature a grid of nine plates on the floor, corresponding to parts of the image displayed on the wall. However, only four plates will fill in the missing parts of the current puzzle image. Four guardians must coordinate and stand on one plate each, specifically those representing the puzzle’s missing pieces. This requires guardians to quickly identify and position themselves according to the current puzzle’s needs, ensuring each missing part is covered. To aid in this process, designate two players to control adds, safeguarding their teammates from additional damage while they focus on solving the puzzles. This coordination and add management are critical in successfully navigating through the puzzle room’s challenges.
- Ascend and Repeat: After completing the puzzles, ascend to the next level via the rotating half-spheres and prepare to repeat the process. The encounter’s dynamics slightly change with different enemy spawns on each level, requiring adaptability in tactics.
- Final Push: On the top level, prioritize add control even after Prism Weapons appear, focusing on Shuro Chi once her shield is down. Utilize high-damage supers and weapons to complete the final damage phase.
Tips for Success
- Communication: Constant, clear communication is key, especially for coordinating Prism Weapon shots, puzzle solutions and add control.
- Adaptability: Be ready to adjust roles and strategies on the fly, particularly if guardians struggle with their assigned roles.
- Time Management: Keep a close eye on the timer, ensuring you’re making good progress both in damage phases and within puzzle rooms.